Easy Steps to Remove Oatey Shower Drain Cover
Standing in a puddle because your shower refuses to drain? Before tackling that stubborn clog, you must get past the cover, commonly made by “Oatey,” a familiar name in home plumbing. According to industry repair professionals, oatey shower drain cover removal is a quick, safe task that will not damage the hidden plumbing beneath your floor. This metal or plastic plate is technically called a “strainer,” and its only job is to catch hair before it chokes your pipes.
Identifying your cover type prevents damage during removal. Your protective strainer sits inside the “flange,” which is simply the outer rim holding it in place. You will either need a basic screwdriver to back out those fasteners or a flat prying tool to pop a smooth tension seal.
Routine shower drain maintenance can feel tough because mineral buildup often locks these pieces together. You are only breaking that crusty seal, not dismantling the floor. Grab a rag to block the pipe so you avoid dropping loose parts, and start the removal process.

The Essential DIY Toolkit for Drain Access
Nothing ruins a quick bathroom fix faster than dropping a tiny screw down the dark plumbing pipe. Before you start, grab a washcloth and stuff it into the pipe opening the moment you loosen the grate. This simple “Rag Trick” creates a physical barrier so metal pieces do not get lost forever.
Gathering the right tools for shower drain cover replacement keeps your project moving smoothly without requiring a trip to the hardware store. You do not need expensive professional plumbing tools, just these household basics:
- Phillips head screwdriver: The tool with the ‘X’ tip (matching the exact size prevents you from stripping the screw heads).
- Flathead screwdriver: The straight-edged one used like a miniature crowbar for gentle prying.
- Needle-nose pliers: Essential for extracting hair and gunk once the cover is off.
- A small rag: Your ultimate drain-blocking safety net.
With your supplies staged on the bathroom floor, you need to identify your target. Picking the correct removal method depends entirely on how your specific grate is attached.
Screw-in vs. Snap-in: The 10-Second Visual Test
Knowing how to remove oatey shower drain cover models begins with a simple glance at the floor. Look closely at the strainer—the industry term for the grated cover where the water flows. Can you see two small screw heads, or is the surface entirely smooth?
Finding two visible metal circles means you have a traditional screw-in grate. These hold the cover tightly against the outer rim, known as the flange. If you spot these fasteners, your Phillips head screwdriver is the only tool needed to free the grate.
A completely smooth surface without visible screws points to a different design. This style uses a “Snap-Tite” or friction-fit mechanism to stay securely attached. When comparing snap-in vs screw-in shower strainers, snap-in types rely on tight physical tension, acting just like a plastic lid pressed onto a food container.
To properly identify drain type models without screws, run your finger along the outer edge to find a small notch. That tiny slot is where a flathead screwdriver goes to safely pop the tension seal. If your visual test revealed metal fasteners instead, your next step requires careful twisting.
How to Unscrew Oatey 130 Series Grates Without Stripping Metal
Before you unscrew oatey drain grate models, you need to protect your plumbing. Lay a small rag directly over the center holes so a slippery fastener doesn’t vanish down the pipe. This simple cloth also provides a safe, visible spot to rest the metal pieces once removed.
Over time, corrosion and mineral deposits can fuse the threads, making removing rusted shower drain screws slightly tricky. If your fasteners feel completely frozen, you are fighting years of soapy buildup rather than just tight metal. Follow this sequence to break that stubborn seal safely:
- Fit a Phillips head screwdriver perfectly into the “X” on the screw.
- Apply heavy downward pressure, pushing straight toward the floor.
- Turn slowly to the left (counter-clockwise) while continuing to push down.
- Stop immediately if the tool slips to avoid grinding the metal.
Why does pushing down matter so much? Without firm downward pressure, your tool will slide out of the groove and shave away the soft metal until the “X” shape disappears entirely. This damage is known as “stripping,” and it makes basic oatey 130 series drain maintenance frustratingly difficult.
Once both screws are resting safely on your rag, lift the grate straight up to finish the job. But what if your visual test earlier showed a completely smooth surface instead? A different approach is required for friction-fit styles.

The Art of the ‘Pop’: Removing Snap-Tite Drain Covers
Did your visual test reveal a smooth surface with zero screws? You have a friction-fit model held firmly by a tension seal. Think of this like prying a paint can lid; you aren’t breaking anything, just releasing a tight grip. Learning how to pop off snap-in shower strainer covers starts with finding the correct access point.
Run your fingers along the outer edge of the cover to locate a tiny, hidden notch. This small gap provides the necessary leverage to do the job without endangering your tile. Slide a flathead screwdriver tip into this space, making sure to keep the metal edge angled away from the shower floor.
Push the screwdriver handle downward gently when prying up stuck shower drain covers. Apply slow, steady pressure rather than jerking the tool, which prevents the hidden plastic “teeth” underneath from cracking. You will feel a distinct pop as the tension seal finally releases its hold.
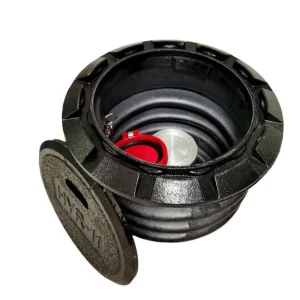
After you lift oatey cashel shower drain strainer models free, the black plastic rim beneath becomes visible. Sometimes, though, that satisfying pop won’t happen because soap scum can fuse the pieces together. If the plastic refuses to budge, you will need to dissolve the mineral buildup.

Winning the Battle Against Mineral ‘Glue’ and Hard Water
Sometimes a stuck drain cover refuses to budge even when no fasteners remain. Before applying more force, check the outer edges for a chalky white crust. Soap scum and hard water act like a weak glue over time. This mineral deposit buildup on drain flanges binds the cover tighter than any screw. Rather than dealing with a hidden mechanical fastener, you are actually fighting years of rock-hard calcium.
Reaching for heavy tools might break the plastic, so turn to your kitchen pantry instead. Pour a half-cup of white vinegar directly over the edges and let it sit for fifteen minutes. The mild acid naturally dissolves the calcium holding everything hostage. Once the liquid works its magic, the crusty seal softens into a mushy paste.
Grab the rubber handle of your screwdriver and gently tap the top of the cover in a circle. These light vibrations help crack any remaining mineral bonds holding the plate down to the shower floor. Once you finally pull the strainer free, you can start the necessary job of cleaning hair from shower drain assembly parts. With the barrier removed, you can thoroughly clean your Oatey drain assembly.
Beyond the Cover: Cleaning Your Oatey Drain Assembly
With the strainer finally out of the way, you can see the black plastic drain assembly underneath. Your first priority is cleaning hair from shower drain assembly components to get your water flowing freely again. Look for a small plastic cup or shower drain insert resting inside the pipe. This is the hair trap basket. Pulling it out usually removes the biggest cause of standing water.
Before putting everything back together, perform this quick Oatey drain maintenance routine:
- Empty the hair trap basket into the trash, then flush the open pipe with hot water.
- Wipe the drain rim (the flange) clean so your cover sits perfectly flat.
- Check the black plastic drain body for any obvious cracks.
Your 5-Minute Checklist for a Secure Reinstallation
With the cover removed and the drain cleared, reinstalling the grate is a straightforward process.
For screw-in models, align the screw holes perfectly before tightening to prevent cross-threading. Never over-tighten screws into the plastic base, which is especially important when fixing a loose shower drain grate. During an oatey drain cover replacement, ensure snap-in covers “click” fully into place so they don’t trip bathers.
Finish your project by testing the drain with a 30-second water run to verify water flow. Each time you confidently handle this routine maintenance, you build practical, lasting homeowner skills.